


Bestseller No. 1 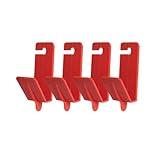
FastCap Crown Molding Clip - Great for General...
- Professional Solution - FastCap's Crown Molding...
- Durable Construction - Made from sturdy nylon, the...
- Easy to Install and Remove - The Crown Molding...
- Versatile Use - This clip is perfect for a variety...
- Efficiency Booster - The Crown Molding Clip not...
Bestseller No. 2 
AltitudeCraft 2-in-1 Crown Molding Jig & Miter Saw...
- NO MATH REQUIRED FOR PERFECT ANGLES: The aluminum...
- ROCK-SOLID NESTED CUTS: Heavy-duty metal stops...
- GUARANTEED REPEATABLE ACCURACY: This 2-in-1 system...
- PRO-GRADE DURABILITY & TRANSFER: Protractor built...
- UNIVERSAL PROTRACTOR & CUSTOM CROWN STOPS: ⚠️...
Bestseller No. 3 
SYCOOVEN Bullnose Corner Trim Gauge, Bullnose Trim...
- 【Durable Material】Durable hard ABS plastic...
- 【Suitable for】Accurately mark bullnose corners...
- 【Saving More Time】Multiple fillets can be...
- 【Function】It helps layout per-fect lines for...
- 【Package Includes】1pc x Bullnose Trim Gauge....
Bestseller No. 4 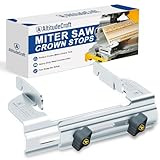
AltitudeCraft Crown Stops for Miter Saw -...
- Simplify Complex Cutting: Streamlines crown...
- Guaranteed Repeatable Accuracy: Heavy-duty metal...
- Custom DEWALT Fitment & Quick Setup: ⚠️...
- Heavy-Duty Galvanized Steel: Constructed from...
- Versatile Stop Block System: Beyond Crown Molding...
Bestseller No. 5 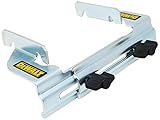
DEWALT Miter Saw Crown Stops (DW7084)
- Miter saw crow stop accurately positions crown...
- Accurately positions crown molding vertically...
- Tough, steel construction
Last update on 2026-02-12 at 19:51 / Images from Amazon
While installing crown molding properly is arguably the most challenging step of most cabinet installations, it is also the most rewarding.
Be sure to check out our cabinet installation series for your next steps.

- About the Author
- Latest Posts

Eric has been a professional woodworker for over thirty years and has worked in small cabinet shops making everything from kitchen cabinets to hand-made furniture. Now working from a home woodworking shop Eric is sharing his passion for woodworking, tool advice and how-to knowledge from his Minnesota-based woodshop.


