
True Position PRO
Professional Grade Cabinet Jig
PRO PICK: TRUE POSITION
IN THIS GUIDE:
› PROFESSIONAL: TRUE POSITION TOOLS – PRO
› BUDGET PICK: TOURACE JIG
› SIMPLE TO USE: RAVINTE HARDWARE TEMPLATE
The best cabinet hardware jigs are designed for jobs of any size, are made from all metal components, and are easy to use.
But, for budget-minded projects or one-time use, a less expensive jig with a reputation for durability and precision is what DIY’ers or occasional woodworkers will choose.
When looking at cabinet jigs, there are three things to keep in mind:
- All aluminum construction is a must to ensure accuracy from door to door.
- Width and length for oversize hardware and handlebars require a professional-grade jig
- Ease of use with clear instructions to achieve an accurate layout.
After building over 100 custom kitchens, installing thousands of handles and knobs, and using jigs in this guide, you’ll learn what jig is best for your project. However, remember, before deciding to go cheap, the jig likely costs a fraction of the total hardware you’ll install with it.
Page Contents
PROFESSIONAL

Professional Grade Jig
While there are dozens of import knockoffs, the Original Cabinet Hardware Jig is a professional jig with a 25-year history and Made In USA quality.
Also available from truepositiontools.com
Only one jig will do everything regarding shaker cabinets, large drawers, or handlebars up to 36″.
While other jigs come in one standard size, the True Position Tools jig comes in three sizes:
- TPT ORIGINAL that works for almost all doors and drawers
- TPT PRO with auto-centering extension
- TPT MAX that drills holes up to 38″ on center
BEST VALUE

Budget Friendly
After trying a few jigs, I’ve kept the TOURACE jig in my toolbox for small jobs as it’s simple to use, accurate, and has an almost all-metal build.
Back in the 1990s, when I first started building cabinets, we used a tape measure, combination square, and awl to mark the center holes.
However, I’ll never revert to a manual method after using this inexpensive jig. Since the TPT jigs are not for every budget (or project), we tested this jig and found it acceptable quality—Especially for small projects.
EASY TO USE
Budget Friendly
For projects with standard sized doors and drawers a simple template will eliminate most measuring mistakes.
But, while easy to use, the trade-off is not being able to perfectly center holes on door stiles.
While a standard jig requires measuring, fractional math, and planning, a template is simple. You can quickly drill holes by simply matching your hardware to the holes (and marking them).
The downside? Templates are best for only a few doors or drawers, as repeated use will eventually wear out the plastic holes.
What is a Cabinet Hardware Jig?
This jig is an adjustable tool that allows accurate, repeated drilling of cabinet handles and knob holes. A jig is commonly prepared in a “T” shape with two intersecting rulers allowing fast and infinite hole layouts on doors and drawers. These jigs feature steel guide bushings and locking screws for ease of use and durability.
Alternatively, cabinet hardware templates are plastic molded guides used for small projects. Due to their plastic design, they do not work best for repeated, large projects.
Features to Consider
I’ve built hundreds of cabinets from raw lumber in a 2-person cabinet shop.
And, while we started using homemade jigs for a particular cabinet hardware style, some are available today that make manual methods obsolete.
So what makes one cabinet hardware jig better than another?
Here’s what I look for in the best cabinet hardware jigs:
- All metal construction
- Able to handle wide drawers with precision
- Support for metric and imperial (inches) measurements
- Firm, metal adjustment knobs to avoid slips
- Squareness (not always a guarantee!)
- Pilot hole bushings with hardened steel inserts
- Support for long handlebars of 12″+
- Self-centering for wide drawers
- Support for shaker doors
Best Cabinet Hardware Jigs
The True Position Tools jig offers the best versatility and accuracy after using many of the market’s budget and professional jigs. This professional-grade jig will do everything from shaker cabinets to flat-face cabinets.
1. Best Overall: True Position Tools Cabinet Hardware Jig
See on Amazon: True Position Tools – PRO
Overview
- Manufacturer: True Position Tools
- Product: PRO
- Type: T-style
- Composition: All metal
- Maximum Handle Size: 12"
For a large project or professional woodworker, the Original Cabinet Hardware Jig from True Position Tools is the best on the market.
Period.
This jig is a must for any professional or large kitchen project, featuring all metal construction, Made in USA quality, and the ability to quickly and easily layout knob or cabinet hardware hole positions.
How to Use
The PRO model cabinet hardware is one of the standard “T-style” cabinet handle jigs.
Its design allows for positioning cabinet knobs or handles on the door or drawer in infinite settings through sliding adjustments.
Steps:
- First, assemble the all metal jig according to the included instructions.
- Then, use the jig to measure the distance required between your handle holes and set the hole spacers.
- Or, if installing knobs, use the supplied center spacer built into the vertical rail
- Finally, for both drawer and doors, set the stop to the appropriate depth (middle of the door stile, center of the drawer front)
- If installing knobs or handles in the middle of a door (or for handlebar installations), use the optional extended ruler attachment
- Use a 5mm jobber bit for drilling the holes
Note: Be sure to test one door or drawer first and fully install a handle or knob to verify you have the proper cabinet hardware placement and that the jig is adjusted correctly.
Similar Models
True Position Tools offers three models of their jigs. And, a bit confusingly, it doesn’t make it clear when you’d want to choose one versus the other:
- TPT – ORIGINAL is the base model and is for handles up to 12-inches in width
- TPT – PRO adds a rapid center extension that quickly centers the jig on drawer fronts
- TPT – MAX has all of the features of the PRO and allows for handle-bars up to 38-inches
The bottom line? Unless you’ll be drilling long handlebars, the PRO is the best choice as it assists with finding center-on drawers.
Pros
- Handle widths to 12-inches
- Allmetal
- .001" accuracy
- Easy to adjust
- Lifetime warranty metal bushings
- Upgrade kit available to 38" handle bars
- Carrying case
- Works on Shaker doors and drawers
Cons
- Price
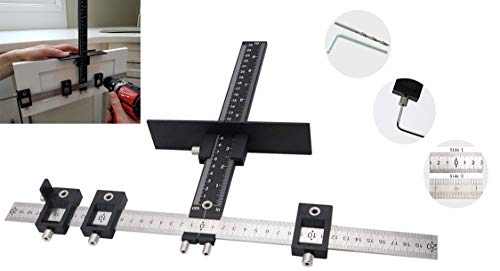
2. Best Budget Jig: TOURACE
See on Amazon: TOURACE Cabinet Jig
Overview
- Manufacturer: TOURACE
- Product: Cabinet Jig
- Type: T-style
- Composition: Metal ruler, plastic slide
- Maximum Handle Size: 12"
The True Position Tools jigs are only for some budgets.
So, while sorting thru the vast field of imitations, we’ve found the TOURACE jig to be an acceptable substitute for smaller jobs or one-time use.
While this jig isn’t all-metal and lacks a hard-sided carrying case, it is the same basic intuitive design as the TPT models.
But installing four doors and three drawer handles in under 10 minutes sealed the deal with liking this jig.
How to Use
As a T-style cabinet knob jig, the Tourace is set up and used similarly to the TPT.
A few things to look out for, though:
- Due to plastic components, be sure to take care to lock the sliding guides firmly – but not strip them
- Check the jig is square once you initially set it up.
Pros
- Budget price
- Accurate
- Carrying bag (soft)
Cons
- Plastic components
- Lacks lifetime warranty
- Limited to 12-inch hardware
- Does not auto-center on drawers
3. Value Clamp On Jig: KREG KHI-PULL

See on Amazon: KREG KHI-PULL
Overview
- Manufacturer: Kreg
- Product: KHI-PULL
- Type: Fixed Base
- Composition: Plastic with metal bushings
- Maximum Handle Size: 5"
For fans of the highly reputable Kreg line, this jig is an excellent option for small projects. And due to its no-frills design, anyone can easily use it.
The Kreg jig departs from the T-style jigs and leverages a simple sliding design for its guides. And, while this jig is plastic, the drill bit bushings are encased in hardened steel.
How to Use
This jig style is more straightforward to set up – and is best when used with Kreg’s popular face clamp.
To use, match the guide bushings to the spacing of your hardware and clamp them to the cabinet door or drawer.
Manufacturer: Kreg Tools
Pros
- Budget price
- Accurate
- Kreg quality
- Easy to use
Cons
- Limited to small hardware
- Doesn't work on shaker drawers
- Plastic componnets
- Requires optional face clamp
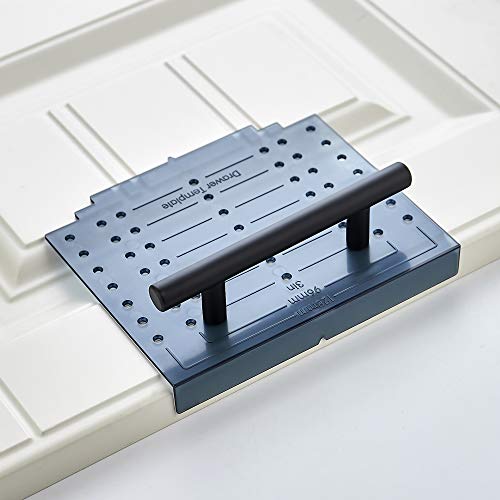
4. Amerock Cabinet Knob Jig Template

See on Amazon: Amerock Template Jig
Overview
If your DIY skills are stretched to the max with measuring and drilling, a cabinet knob jig template might be best for you.
A cabinet knob jig is a plastic sheet with pre-drilled holes for the most popular knob and handle spacing.
To use on doors, select the correct holes for your knob or handle and drill holes like you would have with a jig.
And for drawers, repeat the same thing. However, locating the drawer center (left to right, up and down) would be best.
Tip: Use blue painter’s tape to hide the holes you shouldn’t use.
How to Use
Of all of the jigs on this list, this one is the easiest to use:
- First, there are no moving pieces or set up to the jig
- Your choices are first finding the correct hole layout for your cabinet hardware
- Once you have the suitable holes, I recommend marking them off with tape (either mark the holes to use or mark off the holes not to use)
Pros
- Budget price
- Easy to use
Cons
- Limited to small hardware
- Doesn't work on shaker drawers
- Plastic componnets
- Fixed hole positions
5. Valiant Cabinet Knob JIg
Overview
This Valiant is one of many imitators of the TPT jigs.
But, after testing this jig, we were disappointed due to a misaligned set screw on the main shaft of the jig that caused it to be out-of-square.
And not just a little; it was noticeable over just 5″ on the project I was installing.
Verdict: This jig is not recommended after use in our tests.
Guide to Cabinet Hardware Jigs
Why do I need a cabinet jig?
For a DIY project, here are a few things to consider:
- Accuracy as manual methods are tough to repeat over large #’s of holes
- Cost savings when manual methods may end up damaging a cabinet door or drawer front
- Visual alignment for both knobs and handles to ensure they are perfectly aligned
When should I use a cabinet hardware jig?

Using a jig is a decision between manual methods (error-prone) or investing in a jig that adequately installs expensive hardware on expensive cabinets.
If you have 2-3 doors and a drawer, there’s an alternative: a tape measure, hole punch, and some careful measuring.
And triple-check your measurements.
But when do you need a jig? Well, here are my criteria for a DIY project:
- More than four doors and especially if the knobs or handles will meet “side by side,” as any misalignment will be visible
- Multiple drawers or a “drawer stack” where perfectly-centered lines are a must
- Adding and subtracting fractions isn’t your thing
- You or a spouse is a perfectionist
What other tools will I need?

I’d recommend these four tools in addition to your cabinet hardware jig:
- Lightweight cordless drill
- 3/16″ drill bit
- High-quality tape measure with a wide blade
- Phillips screwdriver
- Or, if you’re installing, a complete set of cabinet installation tools
Who needs to help me?
Installing cabinet hardware is usually a job for one.
Or two if you need to decide on cabinet hardware placement. And I fall into this category.
We recommend help for:
- Deciding on initial knob placement
- Validation after the first door and drawer has its hardware installed
After that, a helper is great to work behind you with a Phillips screwdriver or cordless drill set to a low clutch.
Where do I place my hardware?

This is a question only the owner of the cabinet can answer. But check out our guide to cabinet hardware placement for a few ideas.
How do I install cabinet hardware?
Let’s look at the basic steps, and we’ll cover each in more depth later:
- Order your hardware
- Decide on your cabinet hardware placement
- Setup your cabinet hardware jig to the desired hole locations
- Double-check your measurements
- Triple check
- Drill one door and test installing a knob or handle
- KEEP the cabinet handle jig setup and drill all similar doors
- Double check the jig hasn’t slipped every few doors
- Convert the jig to drawers and repeat steps #3-6
What’s a sacrificial block and why do I need one?

If you haven’t drilled cabinet hardware holes before, the term blow-out might not mean anything to you.
But once you drill a fast hole in a door and find a splintered back of the door or drawer, you’ll realize what a blow-out is.
How do you prevent damage with a sacrificial block? Here’s how:
- First, make sure you are using a sharp (or NEW) Brad point drill bit
- The sacrificial block is a 3/4″x3″x6″ block of scrap wood placed on the backside of the door or drawer where the drill bit will come through
- Firmly hold or use a face clamp (safest) to hold the block in place while drilling
- When drilling, make sure to clear the shavings a few times to keep the bit clean for optimal cutting
In the picture above, you can see I used a scrap of pine as my sacrificial block. But it can be safer to use hardwood if your depth judgment isn’t precise (it takes longer to drill through hardwood!).
Why you want a metal jig and not plastic

It’s all about slipping and durability regarding metal versus plastic.
But first, let’s understand the three general types of cabinet hardware jigs and their construction:
- Fixed jigs that are initially appealing due to price and the ability to skip measurements. But that makes it less flexible and accurate for perfectly centering your holes.
- Clamp-on jigs like the Kreg and a dozen other varieties of mostly fixed-hole jigs. While these jigs are suitable for smaller projects, getting that perfect 31/64 alignment that is surprisingly required on highly symmetrical installations is more challenging.
- Inter-locking rule jigs that depend on two intersecting rules and sliding bore mounts. And while these are a mix of plastic and metal construction, they are my preferred jig and the focus of this section.
Regarding the interlocking rule cabinet jigs, it doesn’t make sense to choose plastic as the material when this jig is built around exact measurements.
Due to that, plastic can fail if:
- Over-torquing the adjustment screws can strip the metal housing embedded in plastic.
- Plastic will not be as straight as the machined metal rule. Period.
- For jigs with a plastic vertical rule, squareness to the horizontal rule will be an issue. Maybe not the first use, but it will shift out of square over adjustments, inevitable drops, and normal wear-and-tear.
Cabinet Hardware Jig Review

I recommend the True Position Tools jig because of its reputation for being precisely square and made from high-quality materials throughout.
I found this out when I purchased and tested the Valiant jig. Due to a design flaw in the set screw, the Valiant jig, pictured below, is almost 1/32″ out of square. And that can be noticeable on a cabinet with short handles and a disaster for longer handles or bars.
Plastic vs. Metal Construction
A plastic jig might work if your project involves a few doors and no drawers. While a plastic jig is $10-15 cheaper, there are a few considerations:
- Plastic jigs with pre-drilled holes and no adjustment might not allow you to precisely center the holes on your workpiece.
- Sliding jigs with a plastic ruler should hold up for a few doors. But metal is preferred for holding power for larger projects with many adjustments.
- Drawers require a long clearance from the jig edge, and metal will outperform plastic for accuracy.
Cabinet Jigs for Long Handles
If your cabinet project involves handles that extend over 12″, you’ll want to go with the True Precision 1935 jig to ensure the accuracy of holes door-to-door.
Why? Simple, shorter jigs would require two setups and holes to be drilled. And a simple difference in the door or drawer front length will throw off your handle hole spacing and cause a disaster.
Frequently Asked Questions for Cabinet Hardware Jigs

How do you install bar pulls on cabinets?
The best method is to use a cabinet hardware jig built for bar pulls. An expertly constructed jig will improve accuracy and visual order because you need repeated placement across multiple drawers and doors.
How do you use cabinet hardware templates?
While each cabinet hardware jig will vary in its use, there are three basic steps. First, combine similar doors or drawers and avoid changing your jig settings. Second, you can use a face clamp to secure the jig to the door or cabinet before drilling. And lastly, use a large backing block on the back side of the door or drawer to avoid a “blowout.”
How do you make a cabinet jig?
While making a simple, fixed-hole jig is possible, I advise purchasing one as it is relatively inexpensive for small jobs. But, for a quick door jig, you can create a jig using two plywood strips nailed in an “L.” Then use a third piece of plywood as the face piece to drill two guide holes in. But, this method is less accurate than commercially available jigs.
What is a cabinet hardware jig?
A cabinet hardware jig is a tool to help install cabinet handles and knob hardware. The jig provides guide holes for holes to be drilled with repeatable accuracy. Cabinet hardware can be quickly installed without concern for crooked handles or knobs.
Summary
While you can drill your cabinet hardware without a jig, it’s error-prone and will result in a lower-quality outcome. This makes matching the best cabinet hardware jig to your project a must before picking up the drill.
- About the Author
- Latest Posts

Eric has been a professional woodworker for over thirty years and has worked in small cabinet shops making everything from kitchen cabinets to hand-made furniture. Now working from a home woodworking shop Eric is sharing his passion for woodworking, tool advice and how-to knowledge from his Minnesota-based woodshop.


