
Choosing the right router bits for cabinet doors requires knowing how doors are assembled and if cabinet hardware will be used for the final finish.
But thankfully there are just a few different styles of router bits to consider.
And a few “relief” profiles that will give your door either a classic or modern look.
In this guide we’ll cover router bits for cabinet doors based on:
- Router bits for cutting door rails and stiles
- Raised panel router bits
- Bits for cutting flat panel doors with a back relief
- Cabinet door edge router bits
- Router bits for glass doors
- Router tables and router lifts to make the job easier
- Best routers for cabinet doors
Popular Bits
Shaker cabinet door bits:
› Whiteside Shaker Router Bits at Amazon ($35.25)
Finger pull bit:
Raised panel bit:
› Amana Raised Panel Bits at Amazon ($49.95)
Page Contents

The Seven Main Types of Router BIts for Cabinet Doors
Bits #1 and #2: Cabinet Door Rail and Stile Router Bit

First, almost all cabinet doors are made from traditional rail and stile construction.
Not sure what that means? Well, to keep it simple (and how I learned how doors were made) its as simple as a frame around the door. First the stiles are the vertical parts of the door “stiles stand”. And second the rails are the top and bottom.
Basically, you’ll use one bit to cut the groove that accepts the door panel. And on the end of the rails another matching bit to cut a relief that will form the glue joint to complete the door.
Bit #3: Raised panel bit

Shown: Amana Raised Panel Bit Set
This is probably something you already know, but a raised panel bit is arguably the most intimidating piece of metal you’ll spin in a power tool.
And using one requires a router table (no exceptions, this isn’t a free-hand bit) and preferably a power feeder.
Since the profile created by the raised panel bit is the #1 feature, you’ll find these router bits for cabinet doors are available in a half dozen different designs.
TIP: I like to setup my doors and run them in two passes. The first pass to remove 60-80% of the material and the second to be a final pass. It is easier on the router.
Bit #4: Finger Pull Router Bit for Cabinet Doors

Shown: Freud Finger Pull Router Bit
While more popular in kitchens 20-30 years ago, there are still a lot of reasons to use a finger pull router bit for your doors.
As you can imply by the name of this router bit, it works by simply creating a lip around the edge of the door that can be used to open and close the door.
But as you can probably guess, the downside of this door style is fingers touching the cabinet doors. Which over time can damage the doors finish (and appearance).
TIP: I like to setup my doors and run them in two passes. The first pass to remove 60-80% of the material and the second to be a final pass. It is easier on the router.
Bit #5: Router Bit Sets For Glass Cabinet Doors (Recoverable Bead)
When it comes to making glass cabinet doors there are a few tricks of the trade.
And the number one trick is to use a glass router bit set that produces a “recoverable bead”. These router bits work by creating a distinct square edge that is cut in two passes:
- The first pass creates a typical cabinet door profile
- But for the second the wood stile and rail are placed upright and a thin kerf of the router bit is used to remove the material.
The only time these bits won’t work? Well, if you have curved profiles (common on older-style doors) the second pass won’t work.
Bit #6: High Quality Round-over Bits

While certainly the easiest cut when making cabinet doors, don’t overlook the simple quarter-round that is almost standard on most doors.
Since most kitchens now use cabinet hardware (be sure to use a hardware jig) the edge style of doors is intentionally simple in a shaker-style design.
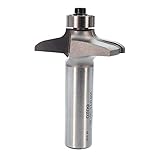
Bit #7: Router Bit for Molding Style Cabinet Doors

Shown: Molding-style Router Bit
When it comes to cabinet doors even the door rail and style can be shaped. Which is where a molding-style bit comes into play to add depth to the door sides.
But why go to this length? Well, high end kitchens that are looking for classic styles to upgrade door appearance will almost always add depth to the doors with a bit like this.
Tips For Choosing the Best Router Bits for Cabinet Doors

Like most tools for your woodworking shop, there are brands that invest in higher quality materials and manufacturing.
And those that don’t.
Why does that matter in router bits?
Simple: durability of the bit over years of use. So, when it comes to purchasing router bits that will easily out-last and out-cost your router and router table be sure to invest in quality.
Go With Top Router Bit Brands

You probably know in hand tools Dewalt, Milwaukee and Makita are among the top brands.
But in router bits the key brands are:
- Whiteside – is often considered the gold standard and a highly sought-after bits due to quality carbides and a 50-year reputation.
- Freud – similar to their saw blades, has a wide selection and high grade carbide
- Infinity Tools – while a niche brand to a lot of woodworkers, this manufacturer offers a large line of router bits and other tools
- Rockler – I’ll have to admit I have a wide variety of blue-branded Rockler bits in my workshop and they perform well with heavy duty construction.
Other than these brands you’ll find dozens of value bits from MLCS, Bosch, Lee Valley, router manufacturers and dozens of imports in online shops.
Eventually Router Bits Need Sharpening

Shown: Trend Diamond Sharpening Kit
While some woodworkers gravitate towards a four edge router bit design it comes with a serious drawback: time to sharpen.
Which makes considering how easy it is to sharpen your router bits a decision when purchasing:
- Look for space between the face of the carbide and the metal backing
- Thicker carbide equates to more sharpening cycles
And of course, be sure to have a sharpening kit on hand to dress up the carbides before each use.
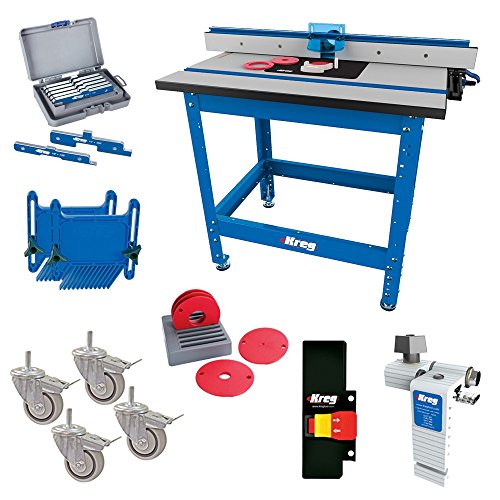
Other Router Accessories You’ll Need

Making cabinet doors with a router requires a bit of skill but also the right tools. And while most woodworkers won’t have all of the tools we’ll review here, a few of them are essential:
However, for larger jobs a power feeder, stock hold-down rollers, router lift and a heavy duty continuous duty router are best.
Router Tables Make Cabinet Door Builds Easier
Related Article: Best Router Tables for Woodworking
No matter how good your skills are with holding a router it won’t work with cabinet doors.
First, raised panel router bits for cabinet doors are MASSIVE they just cannot be free-handed.
But second, routers tend to leave telltale signs of starts and stops on wood (which you’ve probably experienced). Using a router table lets you precisely control the feed rate and consistency. Which gives you a better quality finished product.
Power Feeders Improve Quality and Save Your Back

Related Article: Best Power Feeder For Saws and Router Tables
Back when I first started building cabinets the shaper we used had a massive Powermatic feeder. And while I appreciated it back then, when I switched to a home workshop and didn’t have one on my router table I felt the pain.
Which is why my first upgrade to my router table was a compact “baby” power feeder.
Space Balls For Cabinet Door Construction

Shown: Space Balls (Bag of 100)
For woodworkers that are new to making cabinet doors one of the biggest mistakes is accidently (or unknowingly) gluing the cabinet panel to the frame.
What can go wrong?
Well, if you’re lucky nothing. But all too often a wood panel will move and, because it’s glued in place, will split and crack the inner wood panel. Or worse, separate the door rail from the stile.
The solution? Leave extra room all around the panel and insert space balls. Not only will they reduce the risk of splits, they will help dampening any noise left from loose panels.
Frequently Asked Questions

What router bits do I need to make cabinet doors?
There are three types of router bits you’ll need for cabinet doors. First, the door rail and stile will need a matching router bit set to allow the door to be assembled. Second, most quality doors have either a raised panel or a flat panel with a back relief. And finally, while optional with most kitchens, a finger pull router bit will allow you to build doors without hardware.
How do I cut a raised panel for a door?
While a table saw with a jig is one option, the best way to cut a raised panel edge is with a router table and raised panel bit.
How do I router a cabinet door for glass?
The best way to router a cabinet door for glass is to make it like a normal door but without the panel. Next, after assembled, use a straight bit with bearing to remove the extra material from the rail and stile. Finally, use a sharp chisel to remove any excess from the corners.
Summary
While router bits for cabinet doors are readily available, take some time and make sure you’re buying the best brand for long term use. And, be sure to invest in a router table that will make your projects quality improved (and safer).


Last update on 2025-06-04 at 11:10 / Images from Amazon
- About the Author
- Latest Posts

Eric has been a professional woodworker for over thirty years and has worked in small cabinet shops making everything from kitchen cabinets to hand-made furniture. Now working from a home woodworking shop Eric is sharing his passion for woodworking, tool advice and how-to knowledge from his Minnesota-based woodshop.


