
WOODHAVEN PLANING SLED
Best Value Router Sled – Small to Large
WOODHAVEN SLED
IN THIS GUIDE:
› PROFESSIONAL GRADE: WOODPECKERS SLAB JIG
› BEST SMALL PROJECT: WOODHAVEN
› BUDGET OPTION: VEVOR 60-INCH
› SPOILBOARD BIT: CNC BIT
› DIY LINEAR RAILS: 78-INCH RAILS
Router sleds are one of the best-kept secrets in woodworking. When a planer or wide belt sander doesn’t work for your live edge slabs, cutting boards, or butcher block tops, a router-powered slab flattening mill is where woodworkers turn.
Unfortunately, not a lot of woodworkers realize these mills exist. While similar to a planer or drum sander in their ability to flatten a surface, these jigs differ in that they keep the wood in place and move over the face of the wood.
And, as you can guess, it allows for hefty wood pieces like live edge slabs to be flattened in place.
So what makes these jigs unique? Well, consider the following capabilities:
- Ability to flatten slabs weighing hundreds of pounds
- When correctly setup, will perfectly flatten surfaces
- No snipe that is common to planers and drum sanders
- Quickly cuts uneven surfaces
While a premium jig starts over $1000, in this guide, we’ll show you both ready-made jigs and how to make your sled using high-precision components like linear rails.
Page Contents
My Slab Flattening Mill

They say you don’t build a house the way you want until your third one. And after two bench configurations in my home woodworking shop, I am looking to perfect the benches on the third try.
But, while I have a 22″ wide belt Jet sander, the sheer mass of a 24 x 72 x 3.5″ top couldn’t be lifted.
So after a lot of research, some engineering considerations, and budgeting, my final design ended up consisting of the following:
- Woodhaven Sled with 51-inch rails (for up to 32-inch wide stock)
- Linear rails that were 2000mm (or just over 6 feet). These were hard to buy, and I ended up going with this 2000mm set , and they were straight with decent quality. Worth noting, these rails come in various lengths to let you make a small or large jig.
- Specialty metric screws (M6x20) for connecting the slab jig to the linear rail plates.
- T-track kit to allow the sled jig and linear rails to be quickly separated.
- Bosch 1617EVS 2.25 HP router to upgrade my old Porter Cable.
- Carbide Spoilboard Bit with inserts for replacing dull or chipped cutters.
- Lastly, as seen above, I have a large shop but not a dedicated 4×8 surface to use a jig. So I went with a BORA Centipede that I also use with my Makita cordless track saw and foam for cutting plywood.
After using it a few times, it works BETTER than expected with absolutely flat surfaces. However, a few upgrades I’m planning to make are on dust collection and a non-slip setup with quick hold-downs (t-tracks). I don’t want a dedicated 4×8 sheet of plywood with all of this on it (it’s clamped to the sheet above and disconnects in minutes), so I am thinking through the engineering on that.
Disclaimer: I buy almost all of my woodworking tools from Amazon or Rockler and have shared links to what I believe.

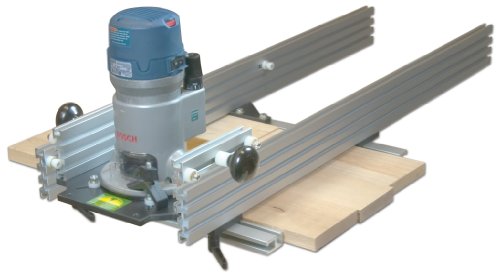
Planing Sled Overview
Shown: Woodhaven Planing Sled
Once woodworkers discover router sleds, the woodworking doors open to projects that just weren’t possible before, from live edge slabs, trimming end grain cutting boards to surfacing 400-pound table tops, there are few flattening jobs a router sled can’t handle.
For proper flattening, there are four essential components of these slides:
- Parallel side rails that support a router. These side rails can be as short as 24″ or up to 96″ and longer.
- Sled that slides on the parallel rails and moves perpendicular across the face of the wood (holding your router, of course).
- Heavy-duty router mounted on the router sled.
- Spoil-board surfacing bit that removes a width of 2-3 inches of material with each pass and 1/32″ of the face of most material.
5 Types of Sleds
From simple plywood jigs to high-grade extruded aluminum rails with machine shop precision, woodworkers will find various options.
What is the best solution for your shop? Well, budget is the first factor. But the size of your projects, the ability to sand out imperfections left by less precise sleds, and shop space all play a factor.
Before deciding on a home-made jig, its worth understanding the quality advantages of a manufactured jig:
- Router deflection (tilting) with DIY jigs can cause damage to the face of the wood
- Ease of sliding both left/right on the rails and forward/backward over the wood is vital
- Rails must be kept clear of debris and sawdust to avoid lifting the sled and creating surface imperfections
Sled #1: Simple DIY Jig

Any woodworker can have a sled setup in an hour or two with just some scrap wood, a proper router, and a spoil board bit. This makes this an attractive starting point for occasional live edge projects or dabbling in end grain cutting boards (that can’t be run through the planer).
Considerations when making a plywood router sled :
- Sliding rails must be perfectly straight and parallel in height
- Use plenty of wax on the rail tops and sled face to allow smooth operation
- Use a “C-clamp” design for the sled connection with the rails. Look for a tight tolerance that avoids play in the rail but allows for a smooth left-to-right movement
Sled #2: Linear Rail DIY Design

See On Amazon: Linear Rails
The top feature of a manufactured sled is the rails are designed to move left to right with extreme ease. And, for woodworkers that know about linear rails, perfect use of this little-known hardware.
Since linear rails are self-contained, problems like dust deflection are much reduced.
Taking these rails one step further, they can be made to work for the sled as well. Pair a longer set of rails with a shorter pair. Then attach a pre-fabricated router plate and custom handles.
Sled #3: Rail Kit Only

See on Amazon: Woodhaven 3010 Rails
Advancing into manufactured components, Woodhaven offers a rail kit that lets you design and use your slab flattening jig. Or, for longer projects provides an add-on rail to handle projects over 48″.
Sled #4: Professional Jig From Woodhaven
See on Amazon: Woodhaven 3004 Sled
Moving into a manufactured router sled jig, woodworkers will find the Woodhaven planing jig that provides a high-quality slide with extendable tracks for larger pieces.
When choosing this jig, you’ll want to remember:
- Double tracks are the left-to-right tracks parallel to the wood’s length.
- Crosscut tracks are the vertical tracks that hold the router sled
- Be sure to check the Woodhaven manual for more info
Sled #5: Premium Router Planer Jig From Woodpeckers

See on Amazon: Woodpeckers Slab Mill
Festool. Leigh. Woodpeckers.
All of the top woodworking brands have premium quality tools and accessories. And with the Woodpecker router sled, you’ll have an out-of-box slab jig that can be quickly set up and taken down.
Key features of the Woodpecker router sled:
- Unique angled slides to reduce dust and chip impact on rails
- High-quality extruded aluminum components
- Large handles for moving the sled across the wood face
The downside to this jig? As you likely know, the premium brands come with a premium price. But remember, the jig cost is often the same as 3 or 4 of the slabs of wood you’ll put through it.
So, as experienced woodworkers know, take a LONG view of your purchases and factor your expenses into the projects you produce.
Top Routers for Sleds

While any router over 2-1/4 horsepower will work for a sled, it’s best to start with the basics: these tools require a significant bit up to 3 inches in diameter.
And as you start to pass after passing over the surface of the wood, precise height adjustments will be necessary.
Which makes the following key features important:
- Soft start motor to avoid “snapping on” with a large bit
- Continuous duty motors for larger jobs
- Easy height adjustment with a strong lock
- Mainstream brand that fits manufactured sled holes
- Dust collection shroud to capture planer-like volumes of dust
- At least 2-1/4 HP of power
- Adjustable speed controls
Budget Router

See on Amazon: Dewalt DW618
For DIY router sleds where the router will be used for multiple jobs, the DW618 is a popular choice for use both on and off the sled.
Key features:
- 2-1/4 HP
- Soft start
- 8,000 – 24,000 RPM adjustment
- Electronic speed control for constant speed under load
- Micro-adjustment with simple collar adjustment ring
- Motor is removable and compatible with router tables
Two-in-One Router for a Planing Sled - Bosch

See on Amazon: Bosch 1617EVSPK Combination Router
A router that works on and off the sled is usually a priority for both DIY sleds and manufactured sleds. And in routers, Bosch has defined itself as the market leader with the 1617EVS line-up.
Key features of the 1617EVSPK:
- 2-1/4 horsepower
- 1/4 and 1/2-inch collets
- Electronic variable speed control
- Soft start
- Micro-adjustment
- Plunge and fixed bases
- Edge guide
- Dust collection chute
- Circle guide
Related: Best Routers for Router Tables
Premium Router - Festool

See on Amazon: Festool 574692 1400 Watt
At the top end of most tools, line-ups sits Festool. And, for router sleds, these high-quality machines offer a few advantages for both on and off-sled performance:
- Top power (measured in watts, not horsepower)
- Speed control
- Integrated dust collection
- Chip deflector
- 1/256-inch micro depth adjustment
- Fast bit changing
Best Spoil Board Bits

Finish quality is always decided by where the carbide meets the wood. No matter the quality of your jig, you’ll want to invest in a high-quality spoil board bit (taken from CNC terminology) that will cut in hardwoods and retain a sharp edge.
Key features to look for:
- 3-inch cutting diameter to reduce passes
- High-quality carbide
- Replaceable carbide inserts
- 1/2″ shank
Populat bits include the budget BINSTAK Carbide Bit or insert style BINSTAK Insert Bit .
Finishing the Job - Sanding After Routing

While a drum sander is a logical next step for finishing a section of wood flattened by a router sled, most woodworkers won’t have this sander, or the piece is too heavy.
And, unfortunately, a drum sander can cause more damage to large pieces than good.
The solution? A high-quality random orbital sander with a low grit sandpaper (24 grit if available) to start and then work your way up.
Related: Best Orbital Sanders For Woodworking
Alternatives to a Router Sled

You may already own one or have it on your wish list, but a drum sander is one of the best alternatives to a router sled since this sander doesn’t “rip” wood; it’s excellent for end-grain projects.
Key benefits:
- Open-ended drum sanders can sand up to 50-inch wide wood projects
- Aggressive 24-grit sandpaper can remove wood fast
- Unlike a planer, a drum sander will not rip wood grain – making it an excellent choice for end-grain or live-edge projects
The downside? Most drum sanders cost upwards of $1000 or more.
And planers, unfortunately, are limited in width.
Read more: Best Drum Sanders for Woodworking.
Frequently Asked Questions

What is a router sled used for?
These sleds are used to precisely flatten large pieces of wood or end-grain wood that cannot be passed through a planer. While they can be used instead of a planner for small jobs, they are most commonly used for live edge projects. Key benefits include moving the machine over the wood, which is helpful for hefty wood pieces like thick tables.
How do you make a homemade router sled?
There are both simple and complex setups. The most straightforward designs include a basic set of wood rails and (usually) a plywood sled to which a router is attached. More complex sleds can be made with linear rails that offer smooth action both left and right and (when combined) back and forth across the wood.
Who makes router sled jigs?
Woodpeckers and Woodhaven make sleds that can be purchased in various lengths and widths. Ranging from $300 to over $1000, they offer a ready-made solution to drop your router in and start cutting.
How are router bit marks removed from a finished surface?
After the spoil board bit is complete, hand sanding is started. Most woodworkers will use low-grit sandpaper in a high-quality orbital sander, progress to finer grits, and then finish sanding with a palm sander.
Summary
While a simple decision on building or buying a slab flattening mill might not be easy, as woodworkers are makers, the challenge and opportunity to custom make a unique jig is often worth it.
- About the Author
- Latest Posts

Eric has been a professional woodworker for over thirty years and has worked in small cabinet shops making everything from kitchen cabinets to hand-made furniture. Now working from a home woodworking shop Eric is sharing his passion for woodworking, tool advice and how-to knowledge from his Minnesota-based woodshop.


Hello,
I really enjoyed this article. I’ve been working on my own sled, and I already have the round linear rails with supports. I plan on creating a sled in the same way you have, linear rails with the woodhaven sled. Would you mind sharing some details about how you connected the woodhaven sled to the linear rail blocks? I would greatly appreciate it.
Thanks very much!
Hi Kevin –
Glad you liked it! The linear rails have two blocks per rail with four screw holes that allowed me to connect a piece of wood to the rails. Then I used two pieces of black phenolic that connected to this strip and the underside of the Woodhaven rails.
Let me know with other questions.
Eric
Thanks! I was wondering what the black material was.
That makes sense. I appreciate it!
Eric,
I bought the same linear rails, router sled, etc. that you have purchased to build your slab flattening set-up but I do have one question: You state that you purchased the t-track set to be able to easily separate the router sled from the linear rails. Will you please explain how and where you installed the t-trac for this purpose? Maybe a pic??
Thanks!
Eddie
Hi Eddie –
I added a photo of the t-track in the article – it stays attached to the linear rail and the wing nuts allow the rails to detach.
Let me know if any other questions!
Eric