
KREG KMS8000 MITER FENCE
Easy to Setup, Use , Quick Adjustment and Accurate
TOP PICK: KREG KMS8000
IN THIS GUIDE:
› PROFESSIONAL PICK: No products found.
› value CHOICE: KREG KMS8000
› DIGITAL ALTERNATIVE: REEKON M1
› DIY T-TRACK: POWERTEC 71367
› SAFETY STICK: FASTCAP 10-MILLION DOLLAR STICK
Few miter saw upgrades are better than adding a miter saw fence system. From quick one-time cuts to a series of dozens or hundreds of cuts, a fence on your miter saw workstation is a huge time saver.
And a miter saw fence will improve the accuracy of the cuts.
In this guide, learn about the following:
- All-in-one fence systems from major manufacturers
- DIY components
- Combination miter saw stands + fences (mobile or workshop)
- Features to look for in a fence system
- Review of the Kreg KMS8000 fence
Lastly, while building a DIY fence is tempting, the value and accuracy of an all-in-one system are generally worth the cost.
Page Contents
What is a Miter Saw Fence System

A miter saw fence system is an add-on to your existing miter saw that provides an integrated fence with stop blocks and a measuring system. Using the measuring system, you can put away your tape and pencil while cutting. And, using the stop blocks, you can quickly cut 5, 20, or 500 cuts with the same precision on each amount.
Who Makes Miter Fence Systems
Not surprisingly, this niche of products needs to be more widely covered. But you will find fence systems from the following well-known tool suppliers:
- Kreg Tool
- FastCap
- Rockler
- Infinity Tools
- ProScale (add-on digital block)
- Woodpeckers
Related Article: Best Miter Saws for Woodworking
Alternatives to a Miter Fence System
Still, trying to decide if you want to invest in a complete system? There are a few options, but you’ll give up some flexibility, speed, and very likely precision:
- DIY miter fence tracks can be made using a t-track and a custom wood block. But, what you save on cost, you give up the accuracy of the custom-made rails found on purchased kits.
- Custom wood fences are the “old school” solution with a self-adhesive ruler and custom stop blocks
- Or, something I’ve used a few times, a simple wood stop block pounded into the bench. Not precisely a fence, but an effective stopper. It’s slow and good for 12″+ cuts on most bars where your miter saw is integrated into the bench.
Best Miter Saw Fence Systems
Perhaps shockingly, there are only a few suppliers of miter saw fence systems. So, with that, there are both all-in-one systems and DIY kits to expand your saws capabilities economically.
1. Best Overall:Woodpeckers StealthStop
No products found.
See the Stealth Stop on : No products found. or Woodpeckers
Overview
New in 2022, the StealthStop resolves a few of the biggest complaints about the Kreg jig: the ability to lock in the stop firmly. And maintain pre-sets.
However, Woodpeckers (a top brand in woodworking) went further and created a unique flip-up design that allows for multiple pre-sets. And, when you’re done with that cut length, fold it away and use the saw with other stops.
Editor: I decided to replace my Kreg Miter Saw System with this after I upgraded to a Festool Kapex. I’ll update this review the results soon.
Key Features
- Four stops
- Left-to-right or right-to-left tape
- Two 48-inch tracks
- Installation brackets
- Set screwdriver
A Made In the USA product, this precision track and stops will allow industrial-grade cutting without worrying about the flip stop moving or flexing.
The primary drawback of this fence? The stop doesn’t directly connect to the measuring tape versus the Kreg or your table saw. So you’ll need a combination square to link the two. A bit slower if you are making dozens of different length cuts.
Pros
- 96 inches of total track
- Four stops
- Mounts horizontally or vertically
- Stops flip away
- Micro-adjustment built into stops
Cons
- Highest price
- Requires a combination square to set distance
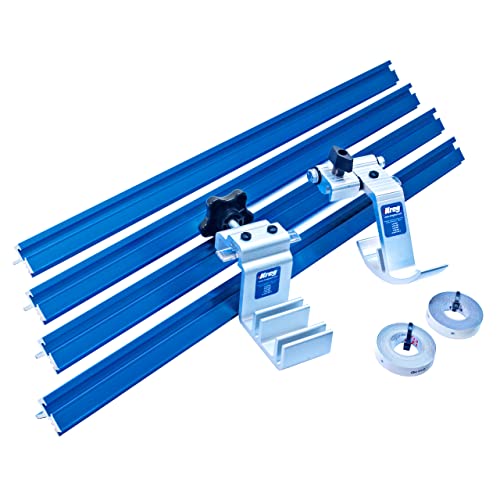
2. Best Value: Kreg KMS8000 Precision Trak Miter Saw Fence System
See on Amazon: KREG KMS8000
Overview
From the popular Kreg Tools comes the Precision Trak system that offers both miters saw and drill press fences up to 96″. And with Kreg’s track record of providing durable products that last, this is a fence system to consider seriously.
Using a decade-plus-old design, this system operates with a wooden fence, offering a left and right-hand fence setup that installs in just a few hours.
And, of course, with this being part of the Kreg lineup of products, there are instructions on building the fence system with Kreg’s popular pocket hole system.
Editor: After needing a miter saw on my own saw, I ultimately chose the Kreg and have installation instructions and a further review below. I chose it because I wanted ALL of the pieces in one package. And I liked the wide ruler and two stops.
Key Features
- Includes two stops for production use or swing-away functionality
- Precision lens for clear view of your cut length
- 8 feet of track in 2-foot lengths
- two self-adhesive measuring tapes that can be cut to length
Review - Kreg Miter Saw Fence Stop System

Kreg lets you decide your configuration by giving you a complete box of all the parts you’ll need. And it includes the stops, measuring tapes, and short lengths to allow you to set up equal fences on both sides of your saw. Or 24″ to the right and 72″ to the left. Or…you get the picture.
After installing this system, one of the features I liked was the tension adjustable swing-away stopper. Since sawdust inevitably pushes its way down the fence, you can lift the stopper off the miter fence and let the dust slide by. Thus preventing an inaccurate cut.
Pros
- 96 inches of track
- Two stops (production & swing away)
- Locks in place rigidly
- Easy to adjust and set length
- Design your own fence
Cons
- Perfect alignment required when installing multiple tracks to avoid "jams" when sliding stop blocks
- Price
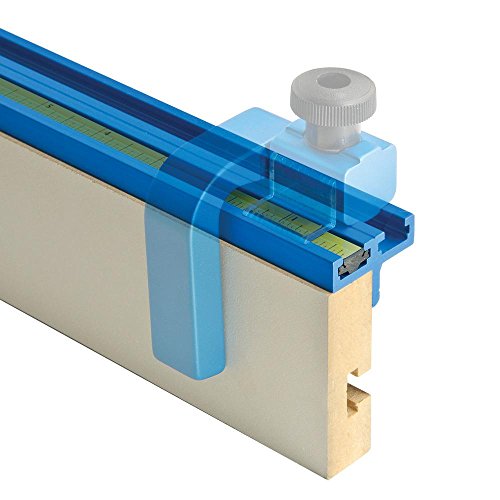
3. Best Fence Stop Rail Rockler Fence Track Fence Stop System
See on Amazon: ROCKLER FENCE STOP
Overview
Along the similar lines of the Kreg but allowing for flexibility in length (and reduced cost), the Rockler system lets you buy shorter distances and customize your track.
With this 36″ DIY kit, you can make left- or right-handed systems by adding in your own tape measure and stops (sold separately, also from Rockler).
Key Features
- 36″ overall length
- Double T-Track design for a stop and tape measure
- Aluminum construction
- Pre-drilled holes for easy installation
Review - Rockler Miter Saw Fence Stop System
Where Kreg packs everything you’ll need into one box, Rockler has taken a different approach and lets you buy a shorter length of double T-Trak. And, by adding extras of your choosing, you can custom-build your stop system to your saws needs.
Pros
- Shorter lengths of track to DIY design
- Less cost vs. Kreg KMS8000
- Slide-in T-Track tape measure
- Optional flip-stop with lens
Cons
- Tape measure not as clear to read as Kreg
- Assembling more than 3 of these systems equals the (larger) Kreg kit cost
- Best for a single extension
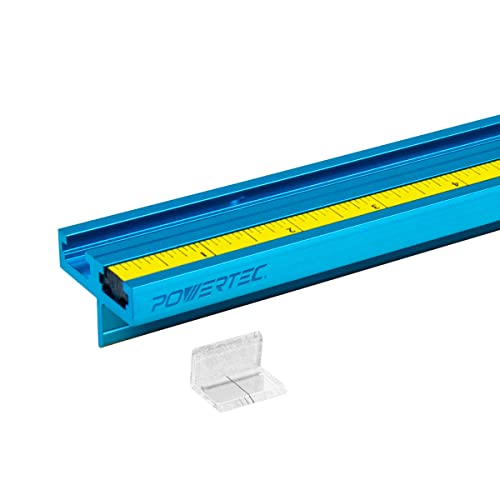
4. Budget DIY Option: POWERTEC Fence Track Fence Stop System
See on Amazon: POWERTEC FENCE TRACK
Overview
The POWERTEC system offers a double T-Track kit that includes the track, measuring tape, and plastic T-track for a tighter budget. However, the POWERTEC flip stop is optional but an economical add-on.
Key Features
- 36″ overall length
- Double T-Track design
- Right and left measurements
- Extruded aluminum
- Pre-drilled holes for easy installation
Review - POWERTECH Double T-Track Fence System
The most significant factor with POWERTECH versus similar offerings is its price.
If your view is $5 savings on the identical product can be spent on a drill bit, then the POWERTECH miter saw fence system was built for you.
Pros
- Shorter lengths of track to DIY design
- Less cost vs. Kreg KMS8000 & Rockler
- Slide-in T-Track tape measure
- Optional flip-stop with lens
Cons
- Tape measure not as clear to read as Kreg
- Best for a single extension
Installing the KREG KMS8000 Miter Saw Fence System

After looking at the options, I decided to go with the Kreg KMS8000 as it had all the components I needed:
- One kit with all the components
- Enough for 48″ to the right and left of my miter saw (I chose 54″ right, 24″ left)
- While restricting double bevel cuts, I chose to install it as a zero clearance fence (more later)
- Single track with the BEST visibility to the Kreg left to right and proper to left tape
It’s worth repeating and noting that. The Kreg system is a single track with the best visible tape system. You’ll thank your eyes later when you’re not squinting into a more petite T-track-based tape.
Unboxing the Kreg Miter Saw Track

Kreg isn’t the leader in jigs by luck. So, it wasn’t a surprise when I opened the miter saw track kit and found everything neatly packed in a well-thought-out tray system.
All the pieces were separated during shipping, with no dings and no mars.
However, like any woodworker, your first reaction might be to the volume of shipped parts. But, in the end, it took more thought to design the fence box system.
Choosing Your Fence Extensions - Longer Left or Right?

Even though my saw is a 15-year-old Makita, I didn’t think twice about building around it, given its durability. So, the first order of business was setting up a 24″ left fence and a 54″ right fence.
It’s worth noting when you’re building the fence, there is a bit of freedom here:
- Your bench may dictate which side has the longer fence (right or left)
- Or, if you’re like me, I’ve grown accustomed to feeding stock left to right. So, while it could be easier to stop the primary fence to the left, it would undo 25+ years of cutting experience.
Making the Fence System Supports

First, you may notice from the picture that the 3/4″ plywood was pre-finished. For some reason, this plywood was cheaper than an unfinished sheet of the same B-grade. So, rather than spend time later finishing, I went with it.
For the fence supports, there are all kinds of options. But, having been down the build path, I’d recommend:
- Well, first, read the instructions. Kreg offers a more straightforward solution than I conjured up using their pocket hole system. Of course.
- Make sure to plan the height of the box so it is perfectly flush with the miter saw.
- Remember to consider the overall fence length and match the box to that length (plus the overhang).
- Use glue and screws
Adapt the Fence Table and Stop to your Saw

While I chose to install the fence as a zero-clearance fence, I still needed the saw to move left and right to a full 45 degrees.
Which, you are probably guessing, means clearance to the right and left is required both for the saw AND your hands. So, be sure to plan this out and make the proper adjustments.
Editor: Make sure to setup, test out your configuration, and adjust every part of the fence system before making final glue-ups and screwing.
The Biggest Fence Decision: To Extend or Overlap

If your miter saw is anything like mine, you’ll have at least 10″ to the left and right that won’t have a fence stop.
Unless you take the (not so obvious) approach of installing the miter, saw fence system IN FRONT of the existing fence.
So, while you lose a double bevel capability, you gain a much more accurate fence system with stops up to about 3″. And, this is where the FastCap 10-million Dollar Stick comes into play. Holding short sticks next to a saw is an absolute DO NOT attempt.
The other option? Sacrifice a miter fence, stop the first 10-14″, and start the system further away from the blade.
Installing the Miter Fence and Stops

Following the instructions, and after your fence blocks are built, install the Kreg T-track on top of a 3/4″ thick fence block (you’ll need to drill the holes).
Here are a few things I ran into:
- On the left of the saw, I only needed one 24″ track, and due to my saw’s existing fence had an 8″ setback before the fence stops could come into play
- On the right of the saw, I had two joints where the 24″ rails butted together. Please be sure to spend some time and PRECISELY align them.
- …or you’ll catch the sliding stops on the tracks for years to come.
Choose Where Your Miter Saw Fence Stops Will Go (Carefully)

Interestingly, and something I didn’t think through first, the stops are made to be assembled for use on the left or the right of the fence.
So, could you take a few minutes and decide which miter saw stop you want on which side?
I like the swing-away stop on the long side of the fence. Adjusting the tension correctly can sit 1/4″ off the fence block base and allow sawdust to slide by.
Install the Adhesive Tapes

After the fence is set up, one of the last steps is installing the adhesive tapes. So, in this step, the biggest trick is setting the ruler tape EXACTLY in place.
With that, as you might have guessed, you should follow the instructions carefully, as the tape will decide your long-term capability.
Frequently Asked Questions

How do you make a miter saw fence?
The best way to make a miter saw fence is to use a fence system. These systems come with either a single or a double T-Track holding adhesive tape, and the miter saw stops. Then, build a fence to the specifications and attach it to your bench.
Does a miter saw need to be bolted down?
Bolting or screwing your miter saw down is both an improvement in safety as well as improved accuracy. In fact, for sliding miter saws, bolting it down is necessary as the sliding action will pull the saw back and forth.
What is the best way to control dust on a miter saw?
For miter saws, the best way to stop dust is by installing a hood that wraps around the saw and connects to your dust collection system. And the best hoods are lighted to ensure the shroud doesn’t darken the cutting area.
Summary
With just a handful of miter saw fence systems on the market, the Kreg is a top solution for most. But, if cost and a smaller fence stop are your goals, there are a couple of dual T-Track systems for your saw.
- About the Author
- Latest Posts

Eric has been a professional woodworker for over thirty years and has worked in small cabinet shops making everything from kitchen cabinets to hand-made furniture. Now working from a home woodworking shop Eric is sharing his passion for woodworking, tool advice and how-to knowledge from his Minnesota-based woodshop.


