
FrameSet Top Mount Tray Slides
Best Slides For Keyboard Trays
TOP PICK: FRAMESET SLIDES
IN THIS GUIDE:
› DRAWER SLIDES: FRMSAET 3/4-EXTENSION
› PRE-MADE TRAY: FRMSAET TRAY + SLIDE
› WRIST REST: GIMARS MEMORY FOAM
› CLAMP-ON TRAY: BONTEC ONE PIECE
While it seems simple initially, a DIY keyboard tray takes a bit of planning and the right supplies to be done right.
In this article, we’ll help you:
- Keyboard tray slides to mount your tray under a desk or table.
- Pre-made or custom-built options for the keyboard tray
- Steps to install and adjust your DIY keyboard tray
- How to build a clamp on the keyboard tray
And, if you’d prefer to purchase a ready-to-go keyboard tray after all that, we’ll show you a couple of options too.
Page Contents
DIY Keyboard Supplies

Getting started, there are just a few things you’ll need to make and install your tray:
- Top mount drawer slides
- Keyboard tray material
- Wood finish if you’re making your tray
Top Mount Drawer Slides
First up is drawer slides because every tray will only slide with drawer slides.
And while your first thought might be to make an L-shaped bracket and use standard side-mount slides, I highly recommend you order top-mount drawer slides if you don’t have sides to mount the tray too. It’s what they are made for, after all.
So, with that, here’s a quick guide to choosing slides:
- Top mount slides should be used if you mount your keyboard tray to the underside of a wood desk or table. Either the
- Side mount slides are the drawer slide to use if you want to place your tray BETWEEN two pieces of wood.
Tray Material
So you have two choices when it comes to the tray. If you decide to buy the drawer slides AND the tray, you MIGHT be better off just buying a pre-made tray for about the exact cost.
But if you’re building your tray to match a desktop (say, a maple desk), you’re on the right track.
Here are a few great ways to make a custom-looking keyboard tray:
- Buy a cutting board that’s at least 12″ by 24″ wide and attach it to the drawer slides you’ve picked out
- Head to a big box store and pick out a piece of pre-glued wood OR grab a stair tread
- Lookup a reclaimed wood dealer near you
- Buy a pre-made melamine shelf material (pictured above)
My Keyboard Tray Combination

So what did I use on my keyboard tray?
Well, I was matching a black desktop and wanted a larger surface area. So, I went with a laminated black melamine shelf and 16″ partial-extension top mount slides.
Tools You’ll Need to Install A Keyboard Tray

- Miter saw, table saw, or circular saw
- Random orbit sander
- Wood glue
- Clamps
- Cordless screwdriver
- Measuring tape
Building the Keyboard Tray
These are the basic steps to build a DIY keyboard tray:
- Determining the size of the tray
- Building the keyboard tray and mounting brackets
- Finishing the keyboard tray
- Installing drawer slides and attaching to the desk
Step #1 - Determine the Size Of The Tray

There are two things to consider in this step:
- The minimum usable size of the tray
- The maximum area you’ll have to install (including side clearance for the slides)
Measure: Desks With No Sides
If your tray doesn’t mount between two vertical surfaces, you’ll have the freedom to pick the keyboard tray width you’d like. And while most purchased trays are between 21-25″ (50-65cm), you can best determine your width by laying out your keyboard and mouse on a flat surface.
After playing around and finding the maximum space you’ll need for moving the mouse (without picking it up!), you’ll have the width down.
Measure: Desks With Sides / Drawers
While it will be easier to install, if your keyboard tray fits between two vertical spaces, you’ll need to accommodate side-mount drawer slides in your measurements.
What’s unique about the drawer slide width?
Almost all side mount drawer slides require a 1/2″ on each side for clearance. So if your opening is 24-1/2″, you’ll need to plan the finished width of your DIY keyboard tray at 23-1/2″.
Determine keyboard tray Width and Depth
At this point, you should have your tray drawer slides selected. The depth of the keyboard tray should allow the entire keyboard to be accessible when the drawer slides are extended.
So what do you think you should watch out for? A few things:
- For partial extension slides, you’ll want to ensure they extend enough for all areas of the keyboard to be accessed.
- And with full extension slides, deduct the depth of the drawer slides mounted behind the front of the desk from the slide length.
Lastly, the minimum depth of the keyboard tray should then be the overall depth of the keyboard PLUS 3″ for a wrist rest.
Step #2 - Building The tray

At the simplest, this step can involve cutting your plywood to width and length, sanding the edges, and proceeding.
But there are a few ways to make the finished tray look better:
- For slide-out shelves, a great way to conceal the plywood edge is with either edge banding or by wrapping the plywood with a 1/2″ x 1″ (or thicker) piece of solid wood
- Then, use a router to round over the wood edge for comfort
If your tools don’t include a table or saw, then edge banding is the way to go.
Step #3 - Applying finish

You’ll want to apply a finish with any keyboard tray to prevent the wood from soaking up oils from your hands. And to make the mouse move smoother over the surface.
My recommendation? You can check out one of the finishes in our guide to clear wood finishes (I prefer General Finishes wipe-on). You’ll have a smooth finish in hours with no messy brushes.
Step #4 - Installing On A Desk

When working with cabinets and furniture, it’s always worth asking what’s the worst that can happen.
And the worst that can happen with this step of the project is poking a screw through the top of your future desk.
So, to avoid this happening, the first step is planning how you’ll mount the keyboard tray and the screws you’ll need. How thick is the top? One trick is pulling the desk away from the wall to review the top edge.
And unless it’s a low-quality desk, the top should be at least 1/2″ thick.
Side mount drawer slide installation
If you mount the keyboard tray between two vertical surfaces, you’ll use side mount slides. While more accessible, in my opinion, to install than a top mount slide, you’ll want to consider the following:
- Find the height of the top of the keyboard tray at the top of the drawer slide.
- If handy, a drawer slide jig will be worth its cost (but not just for this type of drawer alone) if you are doing other remodeling projects
- Mark the height of the slides and attach using supplied screws
- Note: I used a cabinet jack with my standing desk tray to hold the assembled keyboard tray in place. Use light pressure and test the drawer slides to operate smoothly without binding if you use something similar.
Top mount drawer slide installation

The easiest way to install a DIY keyboard tray to an existing surface is by turning it upside down.
By doing this, gravity will work with you and not against you as you install and screw the slides underneath the desk or table.
If that’s not an option, here are a few tricks:
- Fully assemble the keyboard tray and slides.
- Then lift the assembly under the surface and mark with a pencil or masking tape the location of the top mounts
- Make any height adjustments as you do this step (as top mounts are adjustable)
- Then disassemble the tray and install the slides
Adding a Tray to a Standing Desk

Have a standing desk? Then, ensure your keyboard tray and slides will clear the frame and mechanisms below the top.
However, quite a few desks WILL have a crossbar in the way. Which makes your project switch from DIY to buying a clamp-on keyboard tray.
Installing a Pre-made Keyboard Tray
If you realize it might be easier to buy a tray after all of this, it’s NOT a bad idea.
It’s a viable option with slides and material adding up to a basic pre-made unit that likely integrates a wrist wrest.
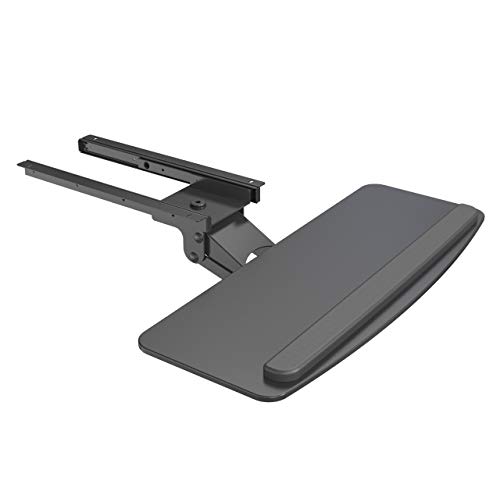
Option 1: Skip the Build and Buy a Keyboard Tray...
Adding a sliding keyboard tray under your desk is simple with this kit that requires just a few screws.
For standard desks and height-adjustable desks, this sliding tray will attach easily. Due to a tilt-adjustable +6-degrees to a -22-degree tilt, it will also bring ergonomic comfort.
Key features:
- Swivels left-to-right for fit in corners
- Tilts up/down for ergonomic adjustment
- Integrated polyurethane cushion for comfort
- Ample room for a mouse
- Dimensions of 25″ wide by 9.8″ deep

Option 2: Clamp on Keyboard Tray
For a glass top desk, a simple clamp-on tray will give you a drawer tray in just seconds.
And this will also work for a wood top, kitchen tables, and any other surface with a lip to hold the clamps. All with no need to use screws.
Key benefits:
- Fits up to 1.5″ thick material
- Sliding tray
- Room for a mouse and keyboard
The only caution is this unit is overall 32.5″ wide and requires adequate mounting space.
Frequently Asked Questions

How do you make a sliding keyboard tray?
A keyboard tray can be made using top mount drawer slides and a home-made tray bottom.
How do I install a keyboard tray?
A keyboard tray is typically screwed into the bottom of a wood desk using #8 screws that are 1/2″ or 5/8″ long.
What is the best under desk keyboard tray?
The key features of a keyboard tray are adjustable tilt, left-to-right swivel and an integrated wrist rest for ergonomics.
Summary
While a DIY keyboard tray is essential for drawer slides and a piece of wood, there are many options to consider as you assemble one.
And, after factoring in time and investment in tray material (and wrist padding), it’s often not a wrong choice to buy one.
- About the Author
- Latest Posts

Eric has been a professional woodworker for over thirty years and has worked in small cabinet shops making everything from kitchen cabinets to hand-made furniture. Now working from a home woodworking shop Eric is sharing his passion for woodworking, tool advice and how-to knowledge from his Minnesota-based woodshop.


