In this article we’ll show you how to apply polycrylic finish on your project in just a few easy steps. We’ll also cover surface preparation and a few of the best rated polycrylic finishes available.
First, polycrylic is water-based alternative to it’s cousin polyurethane. And if you’ve used polyurethane, it’s important to know there are a few steps on how to apply polycrylic that will be different.
Key differences in applying a polycrylic finish:
- Polycrylic works best on light woods
- Due to it’s water-based composition it’s drying time is much less than polyurethane
- Polycrylic applies with a synthetic bristle brush (vs. wipe-on formulas)
Key Supplies:
- Polycrylic: Minwax polycrylic is one of the most popular and from a trusted brand in wood finishes”
- Sanding Sponge: 3M Sanding Sponge in an extra fine grit will sand polycrylic between coats (varies by finish, check your can)
Page Contents
How to Apply Polycrylic Finish on Wood
Step 1 - Prepare the surface for polycrylic application
When cutting wood you’ve no doubt heard the saying cut one and measure twice.
Well, when applying finish it’s finish once and sand twice. Because no great finish ever happened over a poorly finished wood surface.
Here’s a few tips on surface preparation:
- Start course, finish fine. I always use a progressively courser series of sandpaper to reach a finished project. For more on which tools check out our guide to the best sanders for wood.
- Swirls are bad. If you’ve used a random orbit sander you may have noticed this tell-tale mark. Due to it not always disappearing in the finishing process it’s important to identify it and remove swirls (I use a palm sander with 220 grit).
- No dust. Use an air compressor to remove all the fine dust. But never a damp rag as you’ll raise the grain you just sanded.
Lastly, use some common sense and make sure every inch of the project is finish ready. It rarely works to do a touch-up later.
Step 2 - Light stains work best for polycrylic (let it dry!)
One of the most common temptations when completing a wood project is to rush the finish.
But the finishing process needs the right time for the stain to cure or the finish coat. And with polycrylic this is very important due to it’s chemical composition and potential to interact with the stain.
When staining consider these additional factor:
- Humid is bad. Not only does high humidity risk raising the grain of your project it lengthens drying time as well. Due to this, when possible move your work pieces into a humidity controlled environment (if safe).
- Use safety measures. All chemicals are not healthy. So using the safety gloves, masks and other protective measures the directions indicate is a must. Besides, you’ll need most of them for the polycrylic.
- Fix issues now. If you see an imperfection fix it during staining.
- Dark woods are an issue. Per even manufacturer recommendations a dark wood is not best with a polyacrylic top finish.
- Let it dry. Don’t attempt a same day stain and polycrylic finishing. Worse, don’t try to trick the drying process with high heat, hair dryers or other heat sources. Not only is that potentially dangerous, it ignores the dry time the stain requires.
Beyond that, just use common sense and follow the stain instructions. And, you may want to consider a water-based wood stain for the best chemical compatibility.
Step 3 - Applying the first polycrylic coat
Ok, now onto how to apply polycrylic. Or at least the first coat.
Basic steps to apply polycrylic:
- Stir can (do not shake) to evenly mix all contents of can.
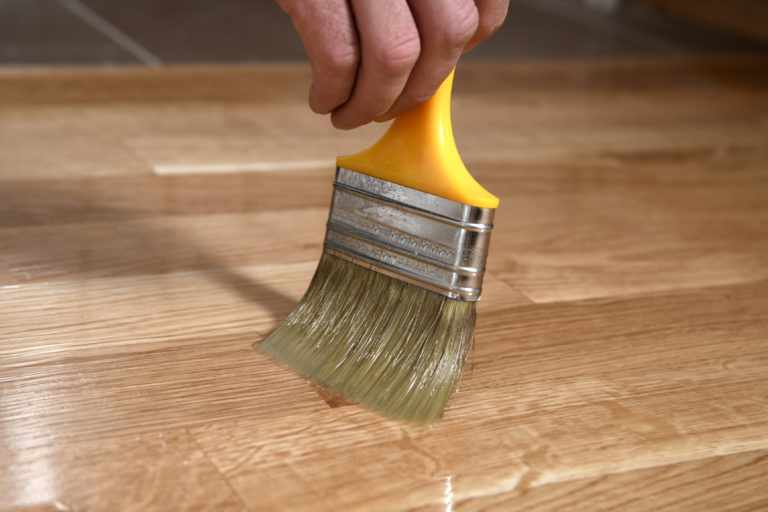
- Use a high quality synthetic brush for application. And cheap is not best for large projects.
- Working quickly apply an even coat to the surface (plan for 3-4 coats).
- It’s best to apply polycrylic with the grain and use as few brush strokes as possible.
- Clean your brush with water and any other surfaces.
- After the recommended time, check the finish to see if another coat is needed before sanding.
Step 4 - Sanding the first polycrylic coats
This step is quick but crucial. After the wood and grain variations are filled with polycrylic a quick sanding will produce a glass-like surface for the final coats.
But fortunately this step is quick and painless if you have the right sanding supplies on hand. And I’ve sanded hundreds of gallons of sealer in my woodworking career.
Sanding techniques:
- Most polycrylic instructions will say to NOT use steel wool. Heed that advice.
- Over the years my preference is a sanding sponge like these 3M extra fine grit sponges.
- Use an air compressor or *dry* cloth to wipe away the sanding dust.
While optional for some, I like to wear a dust mask during this step as the finish will become airborne.
Step 5 - Apply final coats of polycrylic finish
First, make absolutely sure all dust and particles are removed from the surface before continuing.
Following the same steps as Step 3, apply 1-2 more coats of finish as desired for final sheen and thickness. And when done simply follow the same water clean-up steps.
Best Polycrylic Wood Finish
- PROTECT WOOD SURFACES – Minwax Polycrylic Protective Finish protects and…
- CRYSTAL CLEAR FINISH THAT LASTS – The crystal clear finished offered in…
- SATIN SHEEN – Give your wood projects a sleek finish with a satin clear…
- ULTRA FAST DRYING – Get more done with this protective poly coating….
Last update on 2026-01-04 at 23:30 / Images from Amazon
The variations in polycrylic from brand to brand are minimal. Minwax is an industry trusted brand with decades of experience providing consumer and professional finishes.
Unlike many purchases the decision on which is the best polycrylic wood finish is straightforward.
Due to that, you can safely pick one of the MOST POPULAR finishes on the market with the Minwax Polycrylic Protective Finish.
This water-based finish features:
- Ultra-fast drying
- Available in 5 sheens (ultra flat, matte, satin, semi-gloss, gloss)
- Low odor
- Non-yellowing
Manufacturer Information available here.
Frequently Asked Questions on How to Apply Polycrylic

How to reduce streaks in polycrylic?
Streaking in a finish can be the result of a few issues. First, make sure you are using not only the right brush but a high quality brush. If that doesn’t resolve streaking move onto your application technique and amount of finish. Attempting to use too thick of coat will result in un-even application as the polycrylic will not evenly settle. Lastly, for large surfaces you may have to work quickly as polycrylic dries quickly.
Does polycrylic turn yellow?
No. Due to it’s water-based composition a polycrylic will not suffer the same yellowing with age that it’s cousin polyurethane will.
Summary
Like most finishes the steps on how to apply polycrylic to wood are straight forward. But, you’ll need to have the right supplies and safety equipment before you start.
Recommended Additional Reading
- About the Author
- Latest Posts
Eric has been a professional woodworker for over thirty years and has worked in small cabinet shops making everything from kitchen cabinets to hand-made furniture. Now working from a home woodworking shop Eric is sharing his passion for woodworking, tool advice and how-to knowledge from his Minnesota-based woodshop.
